
Hi Everyone - There is a message on my home page re the future of this site.
I have not taught year 7 for four years, so many external links on this pages may be broken by the movement of websites. While I offer my apologies for this, these links will not be updated as I will not teach year 7 again.
Year 7 Science
Note to teachers - This page was constructed in 2020 - the "COVID" year; and may appear somewhat inconsistent (with the rest of the site) for that reason. For example, you will notice a switch from LG based sequencing to weekly sequencing, and then back again. I am not teaching year 7 this year so will not be editing it for some time.
The following curriculum resources are designed for units which follow the Australian Curriculum. Each unit is one term long and will have a central topic such as Chemistry, Biology, Physics, or Geology. The Learning Goals and Success Criteria documents are the key guide to the instructional program for each unit.The units, in order are;
Term 1: Sizzling Science (Chemistry)
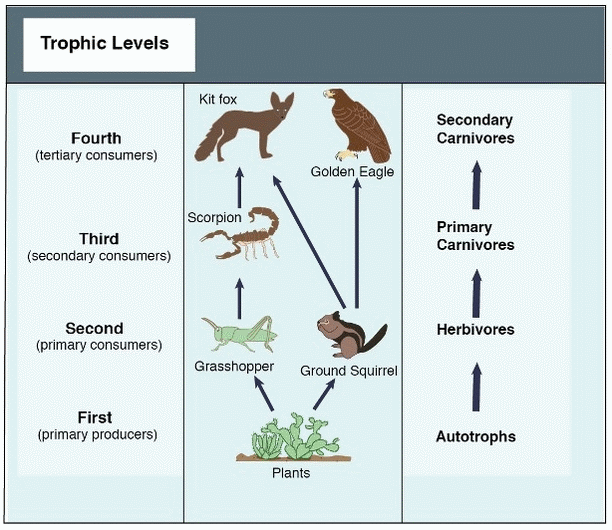
Term 2: Classification and Food Webs (Biology)
Wk1 Wk2 Wk3 Wk4 Wk5 Wk6 Wk7 Wk8
Term 3: Forces (Physics)
Term 4: Resource Management and Astronomy
Unit 1: Sizzling Science
This term is in two parts. The first few weeks are an introduction to the lab and working scientifically. The second and major part of this term is a Chemistry unit on solutions and mixtures.Assessment - Experimental report due in week 9
![]() Student Term Planner Covers whole term.
Student Term Planner Covers whole term.
![]() Learning Goals and Success Criteria - Part A (first 2 weeks) These are a brief set of Succcess Criteria for the two week introductory unit
Learning Goals and Success Criteria - Part A (first 2 weeks) These are a brief set of Succcess Criteria for the two week introductory unit
![]() Learning Goals and Success Criteria - Part B (last 8 weeks) These are the Succcess Criteria for the 8 week Chemistry unit
Learning Goals and Success Criteria - Part B (last 8 weeks) These are the Succcess Criteria for the 8 week Chemistry unit
Part A - two week introductory unit
Learning Goal "A" (6 lessons, 2 weeks)
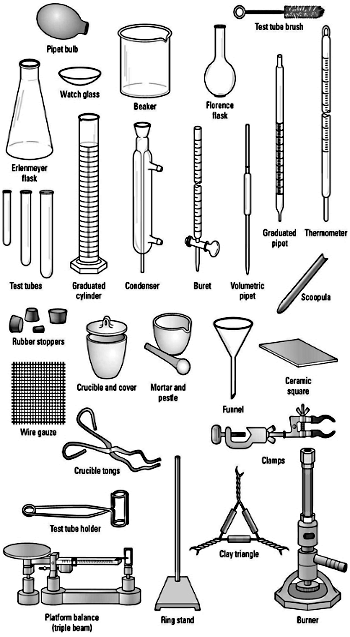
![]() Mix and Match Equipment - A cut and paste activity. Can you get the right names with the right equipment?
Mix and Match Equipment - A cut and paste activity. Can you get the right names with the right equipment?
 GAME - Equipment and Name card flip game - pretty brutal, took me a while, but the start is the hardest, so be patient. expect to take a lot of flips, try to beat 70, 80 is good.
![]() Lab Rules worksheet - Complete the sentences (words provided).
Lab Rules worksheet - Complete the sentences (words provided).
![]() Parts and Use - Bunsen Burner - info sheet for sutting and pasting into book. Useful before practice and the experiment below.
Parts and Use - Bunsen Burner - info sheet for sutting and pasting into book. Useful before practice and the experiment below.
![]() Designing a FAIR TEST experiment. A description and example of how to design a fair test. Use this sheet to plan the experiment below.
Designing a FAIR TEST experiment. A description and example of how to design a fair test. Use this sheet to plan the experiment below.
![]() Experiment: salt concentration. Practice our Bunsen Burner and lab skills, and our first try at writing up an experiment (this is our assessment item this term).
Experiment: salt concentration. Practice our Bunsen Burner and lab skills, and our first try at writing up an experiment (this is our assessment item this term).
![]() Some thinking exercises. 3 questions with a variety of processes for students to think through. Not too hard.
Some thinking exercises. 3 questions with a variety of processes for students to think through. Not too hard.
![]() Scatter plots and Trend lines Worksheet. Good excercise to work on in class before salt experiment. Introduces scatter plots, trend lines, and correlation with some simple exercises.
Scatter plots and Trend lines Worksheet. Good excercise to work on in class before salt experiment. Introduces scatter plots, trend lines, and correlation with some simple exercises.
Part B
Learning Goal ????? This learning goal has been transferred from year 8 into year 7, but I am not teaching year 7 this year, so am not super sure of where it fits into the LGs
Students will be able to explain the different states of matter in terms of the motion and arrangement of particles
![]() Homework sheet 1 - Covers SC 15 - 18
Homework sheet 1 - Covers SC 15 - 18
![]() Homework sheet 2 - Covers SC 18 and 19
Homework sheet 2 - Covers SC 18 and 19
![]() "Chemists Know" song - Apparently a parody of FROZEN (musically). Bit of a weird place to start, but I think students should know why they are learning all this simple stuff about matter and elements etc. It is the start of "modeling" and understanding about what happens around you.
"Chemists Know" song - Apparently a parody of FROZEN (musically). Bit of a weird place to start, but I think students should know why they are learning all this simple stuff about matter and elements etc. It is the start of "modeling" and understanding about what happens around you.
![]() Youtube vid about models in science - bit wierd and very homemade, but I liked the way it explained how models evolve from simple to complex - like the particle model.
Youtube vid about models in science - bit wierd and very homemade, but I liked the way it explained how models evolve from simple to complex - like the particle model.
 PwrPt notes on States of Matter - This covers this LG - you need the notes in yellow on slides 6, 7, and 8.
![]() Notes for States of Matter - one page with 3 cut and pastes. 1 set of notes and 2 activities in this cut and paste handout.
Notes for States of Matter - one page with 3 cut and pastes. 1 set of notes and 2 activities in this cut and paste handout.
![]() Detailed Particle model - may use the simpler one on the right (see pic), or this one.
Detailed Particle model - may use the simpler one on the right (see pic), or this one.
Bubbles and states of matter - video/notes by by Tobin Declan. More fun than real in depth learning, but 10 minute video is oddly engaging. The presenter has fun, but touches on the science as well.
![]() ACTIVITY on States of matter - break the code. Takes a while, be persistent
ACTIVITY on States of matter - break the code. Takes a while, be persistent
![]() Help on the ACTIVITY on States of matter - some of the answers. you still have some work to do
Help on the ACTIVITY on States of matter - some of the answers. you still have some work to do
![]() TEST Particle model - No marks allocated but a 2 page set of questions.
TEST Particle model - No marks allocated but a 2 page set of questions.
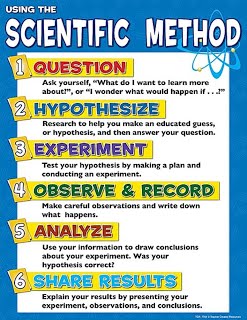
Learning Goal 1 (6 lessons, 2 weeks) - Students can identify problems related to separation which can be investigated experimentally and plan and conduct an experiment.
I will write notes for most of the SC in this LG. I will also include the 5 steps in the new senior SATE experiment report criteria, rather than the 3 steps listed in SC5. The experiment will be at the end of the LG.
![]() Movie about Scientific Method. Its an oldie, but the idea of the scientific procedure (from 2:47mins on) is effectively the Scientific method in full. There are simpler vids out there.
Movie about Scientific Method. Its an oldie, but the idea of the scientific procedure (from 2:47mins on) is effectively the Scientific method in full. There are simpler vids out there.
The scientific method. The is much debate about the scientific method. There is no one method, but this site offers an accessible and simple description which I find very suitable.
![]() Steps of the Scientific Method - Worksheet. A two pager, stole this from mrscienceut.net and edited it. Credit to him for the original hard work.
Steps of the Scientific Method - Worksheet. A two pager, stole this from mrscienceut.net and edited it. Credit to him for the original hard work.
![]() Experimenting and the Scientific Method - Worksheet. A two pager again, also stole this from mrscienceut.net and edited it. Credit to him for the original hard work.
Experimenting and the Scientific Method - Worksheet. A two pager again, also stole this from mrscienceut.net and edited it. Credit to him for the original hard work.
![]() Separating Experiment. A two pager, planning and simple report style. Good simple approach for year 7. Needs some teacher input.
Separating Experiment. A two pager, planning and simple report style. Good simple approach for year 7. Needs some teacher input.
Learning Goal 2 (6 lessons, 2 weeks) - Students will be able to use evidence to support their conclusions and be able to communicate their ideas, methods and findings using scientific language
I have got resources for this LG in the first section (Part A), so if i have not used them earlier, now is the time. If I have used them then this LG is already covered. If I want another experiment to do, a simple experiment on the effect of sugar concentration on the viscosity of water (like the link below) would suitable.
Effect of sugar concentration on viscosity. Lots of support here for doing a simple experiment which would meet all the SC for this LG. Could use Test tubes as shown in the very last video, rather than flow rate as a measure of viscosity.
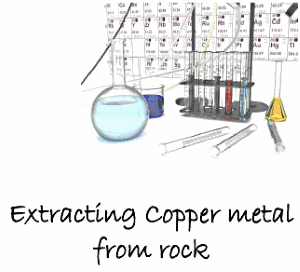
Below are three experiments relating to extracting copper metal from rock. Technically this fits into the idea of separating mixtures so I will try all three experiments with my class. The copper extraction will work using experiments 1 and 3 only. Experiment 2 uses colourimeters (visible light spectrometers) and may seem complicated to younger students, so you could give this part a miss. It does involve some great science skills however, so if you have a talented class, I recommend it.
 PART 1 - Copper extraction from rock Crushing the rock and dissolving the copper mineral.
PART 2 - Copper extraction from rock Measuring how much copper is in the solution. Uses a visible light spectrometer.
PART 3 - Copper extraction from rock Using electricity to produce the copper metal.
Booklet (all parts) -Copper extraction from rock All parts together with a cool title cover
Learning Goal 3 (3 lessons, 1 week) - Students will understand that substances can be classified into two groups: mixtures and pure substances, and identify at least two examples of each
See the image on the right - classifying pure substances and mixtures
![]() Pure substances versus Mixtures notes. Two pages but print to fit one A4 page. Use for notes.
Pure substances versus Mixtures notes. Two pages but print to fit one A4 page. Use for notes.
![]() Pure substances v Mixtures. 15+ mins. By Chem academy. Long, but very simple and clear.
Pure substances v Mixtures. 15+ mins. By Chem academy. Long, but very simple and clear.
![]() Pure substances v Mixtures. 7 mins. By Kathy Meyer. Not totally sure why I like this one, but it does make it's points very clear.
Pure substances v Mixtures. 7 mins. By Kathy Meyer. Not totally sure why I like this one, but it does make it's points very clear.
![]() Solutions and Separation notes. A two pager on solutions, suspensions, colloids, and separating techniques. More than is in the SC, but can always cut down.
Solutions and Separation notes. A two pager on solutions, suspensions, colloids, and separating techniques. More than is in the SC, but can always cut down.
![]() Worksheet - Questions on Solutions
Worksheet - Questions on Solutions
Learning Goal 4 (12 lessons, 4 weeks) - Students will understand that mixtures, including solutions, contain a number of pure substances that can be separated using a range of techniques
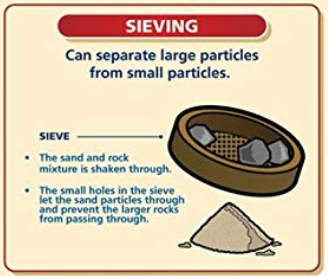
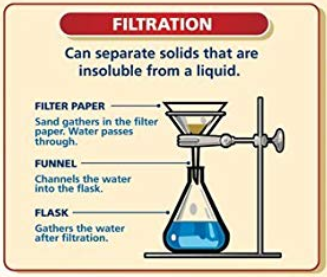
Separation techniques. This linked poage goes forever and has all the info you need (I think - honestly couldn't read it all in detail, just skimmed). A pdf version (30 odd pages in length) of this page is here. Courtesy of SIYAVULA - a South Africa organization.
Worksheet - Separating a complex mixture. Good two pager which leads students through the process of separating the components of a complex mixture.
Background on Indigenous Separation techniques. Link to Aust. Curric. site. Use for notes or some questions.
Background on Separation applications in the home. Link is to a Aust. Science Teachers Association document. Use for notes or some questions.
Revision Test. From the Text provided a few reources ago. Simple and not too difficult.
Advanced Separation assignment - copper extraction from rock. This is very advanced experiment for year 7 and can be an overwhelming doc for year 7 students to read. Therefore the assignment can be complete is three separate (and more easily dealt with) stages. the first part is PART ONE The second part is PART TWO and the third part is PART THREE
(For the teachers out there) Below are listed three assignment centred on separating mixtures. Take your pick.
![]() Separating Microplastics Assignment - very topical, my favorite.
Separating Microplastics Assignment - very topical, my favorite.
![]() Separating Mixtures - Known mixture (three)
Separating Mixtures - Known mixture (three)
![]() 2023 separating Mixtures assignment - Unknown mixture (six)
2023 separating Mixtures assignment - Unknown mixture (six)
Unit 2: Classification and Food Webs
![]() Learning Goals and Success Criteria
Learning Goals and Success Criteria
![]() WATCH THIS VIDEO. My talking head an explanation of how the course is being organised. Should play in screen. Explains how to get things done. Plus read below.
WATCH THIS VIDEO. My talking head an explanation of how the course is being organised. Should play in screen. Explains how to get things done. Plus read below.
I have created and shared a class OneNote, and it is here that students will be completing task I set. I can access their work directly in OneNote so it enables me to check student progress quickly. Worksheets for students to complete will be in a homework tab in this OneNote. In the OneNote there will also be additional information for students.
Stileapp is an online learning platform the school has paid for. It allows me to set learning tasks and assess student progress. On Sunday night stileapp should have sent all students an email - with instructions and a class code. Follow the instructions to join the class at stileapp. I have provide my own instructions and the class code below in the first link. The second link is the stileapp home page.
Week 1 (3 lessons)
![]() How to login to STILEAPP - follow the simple simple instructions to log into the stile app and join the class with the code - VRKX8Q. Link to stileapp is below.
How to login to STILEAPP - follow the simple simple instructions to log into the stile app and join the class with the code - VRKX8Q. Link to stileapp is below.
 Stileapp login page - Click here for the login page to STILE
Topic 1 - Why Classify
Learning Goal - understand that classification is the grouping of similar objects into groups based on their similar characteristics.
This week will include work inside the stileapp and your OneNote.
Stileapp - You should complete the introduction, and then lessons 1.1, 1.2, and 1.6. These should be the only lesson visible to you.
![]() Mnemonic activity - Construct a mnomonic using the characteristics of living things. This document is already in the homework section of your OneNote where you can type over it. However sometimes the typing over does not always align very well, so you could download the word copy from here, do your work on it, and then insert into your homework folder if you want. While Onenote is not accessible during the day, download this doc, add your name to the end of the file name, complete, and email to me.
Mnemonic activity - Construct a mnomonic using the characteristics of living things. This document is already in the homework section of your OneNote where you can type over it. However sometimes the typing over does not always align very well, so you could download the word copy from here, do your work on it, and then insert into your homework folder if you want. While Onenote is not accessible during the day, download this doc, add your name to the end of the file name, complete, and email to me.
![]() Identifying differences for Classifying - A task about identifying and describing differences. As above, this is already in your OneNote, but you could download it from here if you want. While Onenote is not accessible during the day, download this doc, add your name to the end of the file name, complete, and email to me.
Identifying differences for Classifying - A task about identifying and describing differences. As above, this is already in your OneNote, but you could download it from here if you want. While Onenote is not accessible during the day, download this doc, add your name to the end of the file name, complete, and email to me.
Summary of week 1 - you should know the characteristics of living things, know why scientists classify living things, and explain why diversity is important. You will have completed the introduction and 3 lessons on Stileapp and two activities in the OneNote.
Week 2 (3 lessons)
USING ONENOTE - Aside from the stileapp work, I recommend you complete your work in the local OneNote app - this makes it far easier for me to check your work and give direct feedback. OneNote is often not syncing to the online version during the day but there is a very simple workaround. First open the local OneNote app and sync it at night (or early morning, well before 9am) to download the week 2 work. During the day complete your work in the local app as per "normal" (whatever you normal is). At night again, reopen and sync the app to upload your work. It is not ideal, but is easy! The non-preferred way, but still acceptable is to download the docs you need from this website, add your name to the end of the filename, complete the Qs, and email back as an attachment.
LG - understand that living things can be organised using a hierarchical system of classification.
Stileapp - login and complete lesson 1.3, 1.4 and Project 1.5. You do not have to do these at the start of the week, but the project may take you a while, so have a look at it first so you can plan some time to spend on it.
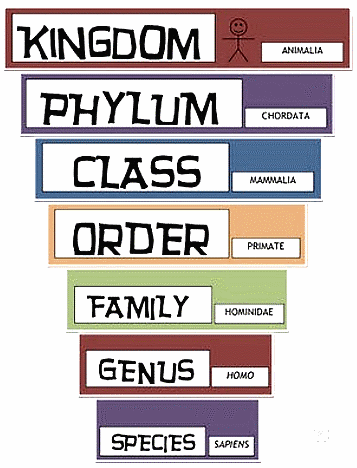
![]() Naming Organisms Scientifically This work has already been covered in the stileapp. You can read it if you wish. It is already in your OneNote, in your class notes tab.
Naming Organisms Scientifically This work has already been covered in the stileapp. You can read it if you wish. It is already in your OneNote, in your class notes tab.
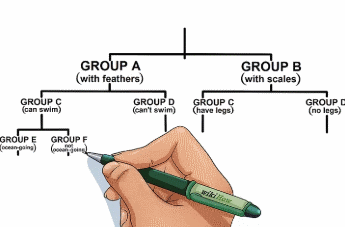
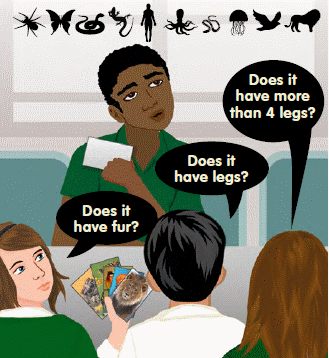
![]() Classifying using dichotomous keys. Read and complete the questions. This is already in your OneNote, in your homework tab, as "Wk2 Classifying usiing dichotomous keys", and you should do the work there (see red type above). You could download it from here if you want, add your name to the end of the file name, complete, and email to me as an attachement.
Classifying using dichotomous keys. Read and complete the questions. This is already in your OneNote, in your homework tab, as "Wk2 Classifying usiing dichotomous keys", and you should do the work there (see red type above). You could download it from here if you want, add your name to the end of the file name, complete, and email to me as an attachement.
![]() Classifying - an aboriginal perspective. Read and complete the questions. This is already in your OneNote, in your homework tab, as "Wk2 Classifying - Aboriginal Perspective", and you should do the work there (see red type above). You could download it from here if you want, add your name to the end of the file name, complete, and email to me as an attachement.
Classifying - an aboriginal perspective. Read and complete the questions. This is already in your OneNote, in your homework tab, as "Wk2 Classifying - Aboriginal Perspective", and you should do the work there (see red type above). You could download it from here if you want, add your name to the end of the file name, complete, and email to me as an attachement.
Stileapp - login and complete 2.2 practical activity, and the test
Summary of week 2 - you should know the seven tiers of the Linnaeus classification system, understand how the scientific name of species is formed, recognise and use a dichotomous key. You should have completed 2 lessons, a project, a practical activity, and a test in Stileapp; and two worksheets in your OneNote.
Week 3 (2 lessons)
This week is all about dichotomous keys. This is a shorter week due to the public holiday, as we have only two lessons - so there is less work below than in previous weeks. For some of you who have been working hard that means less to do and a chance to relax a little. However for those students who have not completed activites in previous weeks this is an opportunity to catch up. You have only 1 activity to complete this week but it is a big one.
STILEAPP Login page - Check you have completed all the previous activities and complete any lessons, activities, or tests you have not yet done. There is no extra assigned Stileapp lesson for this week.
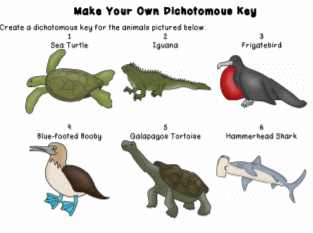
![]() Bug classification - Making a dichotomous key for "bugs" - follow the instruction (and watch the video below) to construct a key. This activity is also in the OneNote, but has been inserted as a file attachment only. You need to complete this activity in microsoft word and then insert into your homework tab, in a page called Wk3 Dichotomous Key, as a file printout (not file attachment). This will enable me to check it reasonably quickly. A completed answer to this key (one I did as an example) is here
Bug classification - Making a dichotomous key for "bugs" - follow the instruction (and watch the video below) to construct a key. This activity is also in the OneNote, but has been inserted as a file attachment only. You need to complete this activity in microsoft word and then insert into your homework tab, in a page called Wk3 Dichotomous Key, as a file printout (not file attachment). This will enable me to check it reasonably quickly. A completed answer to this key (one I did as an example) is here
![]() Movie about creating a dichotomous key activity above - this is a screen capture video showing how to organise the key described above. I forgot to mute my mic so there is a fraction of background noise - I suggest you mute your speakers so it is not distracting.
Movie about creating a dichotomous key activity above - this is a screen capture video showing how to organise the key described above. I forgot to mute my mic so there is a fraction of background noise - I suggest you mute your speakers so it is not distracting.
Summary of week 3 - you should constructed one dichotomous key and caught up on any stileapp activities you may not have completed. Scroll up to see which Stileapp activities were listed for weeks 1 and 2.
Week 4 (3 lessons)
This week finishes your work on dichotomous keys, and introduces the idea of ecosystems - starting with some terminology and food chains. Some of you may be very familiar with Ecosystems already. We start with 1 activity in your OneNote which covers dichotomous keys and also have two stile lessons.
# You may like to check an answer to that huge dichotomous key I made you do last week. If you scroll back up to the second activity in week 3, I have added an "answer". It is worth a read.
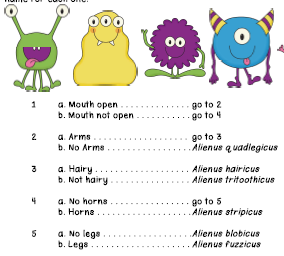
- using written or list style Dichotomous keys - Excellent Activities and simple in its approach. Read and complete this handout. It is in your OneNote, homework tab, as a Wk 4 document. You could download from here, but please insert into the OneNote as a printout on the correct page. If you need help send me an email. The original document was produced by Trisha Stohr-Hunt here.
STILEAPP Login page - You have a new topic available to you...Food chains and Fodd Webs. Complete the introduction and lesson 1.1.
Summary of week 4 - you should have read and completed 4 pages of a worksheet in your OneNote (or inserted your work into the OneNote. You have completed two activities in Stileapp.
NOTE: The following resources are not currently being used for (online) learning, but are related to the week 4 work.
Written dichotomous key - naming buttons - this activity uses a vertical written key.
Week 5 (3 lessons)
This week continues the work on food chains and starts the idea of food webs. We are actually ahead of schedule as this week (in the student term planner) is supposed to be revision and a test on dichotomous keys. At this stage there is no planing to have this test, but I have included an activity on making a key which I can use for evaluation if I am required to. Pretty easy week this week. There is no stile activity.
![]() Foodchains Video - Very much a review of what you probably already know. Watch this - use it to answer the Qs on the worksheet below. If you cannot access the video Click here
Foodchains Video - Very much a review of what you probably already know. Watch this - use it to answer the Qs on the worksheet below. If you cannot access the video Click here
![]() Worksheet for food chains video - simple as, answer 4 Qs. This sheet is already in your OneNote, in your homework tab, as a "Wk 5 Worksheet for Foodchains" sheet
Worksheet for food chains video - simple as, answer 4 Qs. This sheet is already in your OneNote, in your homework tab, as a "Wk 5 Worksheet for Foodchains" sheet
![]() Populations worksheet -answer the Qs vfor each graph. This is a numeracy and data interpretation activity and not so easy. It is already in the OneNote, in your homework tab, as "Wk 5 Populations worksheet". Adapted from biology corner, data interpretation
Populations worksheet -answer the Qs vfor each graph. This is a numeracy and data interpretation activity and not so easy. It is already in the OneNote, in your homework tab, as "Wk 5 Populations worksheet". Adapted from biology corner, data interpretation
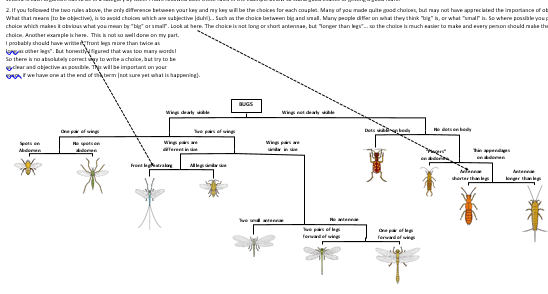
 This activity I will use as an assessment piece if asked to do one. Your task is convert the bug dichotomous key, the flowchart version, shown here into a table form dichotomous key. Last week we worked on table forms of dichotomous keys (link to this sheet if you want a reminder and a simple example is shown over on the right. A table dichotomous key use a series of questions in a table or list form, rather than a flowchart. Use my bug flowchart key here to make a bug Table key. Do this in microsoft word, but I am not providing a template, you will have to make your table key from scratch. Please do not use your own bug key, use the one I have provided - this makes it far easier for me to check you are correct. There is a blank page in your OneNote, in your homework tab, called "Wk 5 Table form of Bug Key"... you should insert your key into this empty page.
Summary of week 5 - you will have done two activities in the OneNote and constructed one table key for Bugs and have inserted this into the OneNote.
Below is an optional activity. It is not compulsory. If you want to try it...warning it is very hard... take a screenshot of how well you went and email it to me.
Difficult Food Web Activity - What score did you get?
Week 6 (3 lessons)
This week we will spend some more time on Ecosystems and the flow of energy through them.
Great notes on Food Chain and Food Webs. A hard copy is available here Note: some ti combinations are missing, as they did not copy accross. This resources is a little advanced, but very clear. There is a set of questions below for you to answer from this website.
![]() Worksheet - Food chains and Food webs. Series of Qs which will allow you to extract some notes form the website above. Download these Qs, but type your notes on an other word doc, or write the notes into your notebook. Insert a copy of your notes into the OneNote. There is a page for this "wk 6 Notes from website"
Worksheet - Food chains and Food webs. Series of Qs which will allow you to extract some notes form the website above. Download these Qs, but type your notes on an other word doc, or write the notes into your notebook. Insert a copy of your notes into the OneNote. There is a page for this "wk 6 Notes from website"
![]() Food Web worksheet. A worksheet on foodwebs. This is already in your OneNote, homework tab, as a "Wk 6 Food web Exercise".
Food Web worksheet. A worksheet on foodwebs. This is already in your OneNote, homework tab, as a "Wk 6 Food web Exercise".
Multiple Choice Quiz It is in the OneNote and you can do it there. Or download and use a highlighter to indicate your answers, remember to insert into the OneNote page when you are done (there is a page waiting).
Week 7 (3 lessons)
Week 7 is not constructed yet. I am teaching yr 7 for the first time this year, so it is all from scratch.
This week we will spend more time on Ecosystems and begin to look at population changes in ecosystems, and the effect of human activity on Ecosystems
![]() Hare and Lynx Population graph- graphing and analysis worksheet. I recommend you download this doc and work in it as a word doc, mainly because you have to puts dots and crosses on a graph. This is much easier using text boxes in microsoft word, than it is in the OneNote. Insert it into the OneNote (there is a page waiting) when you are done.
Hare and Lynx Population graph- graphing and analysis worksheet. I recommend you download this doc and work in it as a word doc, mainly because you have to puts dots and crosses on a graph. This is much easier using text boxes in microsoft word, than it is in the OneNote. Insert it into the OneNote (there is a page waiting) when you are done.
![]() Graphing Practice problems - Stole this sheet, edited it, and converted to a word doc. These are practice line graphs, literally... there is no instruction on how to do. I recommend you download this doc and work in it as a word doc, mainly because you have to puts dots and crosses on a graph. This is much easier using text boxes in microsoft word, than it is in the OneNote. Insert it into the OneNote (there is a page waiting) when you are done.
Graphing Practice problems - Stole this sheet, edited it, and converted to a word doc. These are practice line graphs, literally... there is no instruction on how to do. I recommend you download this doc and work in it as a word doc, mainly because you have to puts dots and crosses on a graph. This is much easier using text boxes in microsoft word, than it is in the OneNote. Insert it into the OneNote (there is a page waiting) when you are done.
STILEAPP Login page - You have a new topic available to you...Ecosystems. We will not do a lot of this course as it is mostly a Year 9 course. However some parts are suitable for us. Complete the introduction lesson - "What do you already know"?.
Week 8 (3 lessons)
Week 8 is not fully constructed yet, but we should finish the course this wedk and begin revision wither this week or next. Last week we took a lot longer to do graphing - a good thing as it is an important skill in science. We still need to cover the broad cocept of ecosystems and human impacts. Might do some group work!!!!!!
STILEAPP Login page - Repeat from last week as we did not get to itYou have a new topic available to you...Ecosystems. We will not do a lot of this course as it is mostly a Year 9 course. However some parts are suitable for us. Complete the introduction lesson - "What do you already know"?.
PowerPoint on Human Impacts. This is really just visuals - lots of images to initiate discussion about the ways Humans affect ecosystems.
Info on human Impacts. Sort of an interactive... info mainly, but makes some good points. I use it to construct some simple notes for students.
Week 9 (3 lessons)
This week is all about revision for the exam. It has been a very disrupted term, and we need to complete some assessment on classification, and on food webs and ecosystems.
![]() Food web revision. Simple - will start with this. Will do as a hard copy.
Food web revision. Simple - will start with this. Will do as a hard copy.
![]() Food web on the river Torrens This is a fairly comprehensive food web activity and should tell us what it is you still need to learn. Once you have completed this add two Qs. Q1 - what abiotic factors are improtant in the ecosystem?. Q2 - what would be the short term and long term effect of a large bush fire on this ecosystem? Can download and complete, or ask for a hard copy in class.
Food web on the river Torrens This is a fairly comprehensive food web activity and should tell us what it is you still need to learn. Once you have completed this add two Qs. Q1 - what abiotic factors are improtant in the ecosystem?. Q2 - what would be the short term and long term effect of a large bush fire on this ecosystem? Can download and complete, or ask for a hard copy in class.
![]() Food webs revision. Some practice on the terminology.
Food webs revision. Some practice on the terminology.
Unit 3: Forces
![]() Learning Goals and Success Criteria - this is the key document for know what to study and what we will cover in the course. I will teach this more or less in order.
Learning Goals and Success Criteria - this is the key document for know what to study and what we will cover in the course. I will teach this more or less in order.
LEARNING GOAL 1 - understand that forces affect the motion of objects. 7 lessons
Reference notes on Forces. NOTE:There are 16 learning guides on this page. We will start with the first one "An Introduction", and then the "force Diagrams". However if you scroll down there are some useful other topics which also encompass forces.
![]() Forces Booklet. Will start with this for the first 5 lessons. Start with some theory and then has 3 experiments for students to complete. 12 Pages. Can print out, or complete electronically.
Forces Booklet. Will start with this for the first 5 lessons. Start with some theory and then has 3 experiments for students to complete. 12 Pages. Can print out, or complete electronically.
![]() ASSIGNMENT - rubber bands and Hooke's law Made this up very quickly as I suddenly realised that the rubber band experiment in the booklet above would make a great exercise in practicing some data analysis. there is no criteria sheet, but I will make it very clear in class what marks are allocated for.
ASSIGNMENT - rubber bands and Hooke's law Made this up very quickly as I suddenly realised that the rubber band experiment in the booklet above would make a great exercise in practicing some data analysis. there is no criteria sheet, but I will make it very clear in class what marks are allocated for.
Balanced and Unbalanced forces - Slideshow. Very simple intro, suitable for all, great to start with. By Dayna Lee Martinez. Hard copy is here - but it has a video added to last slide and a quiz added (which are below).
![]() Balanced and unbalanced Forces. Covers the basics. By FuseSchool. Has a quick quiz - see below.
Balanced and unbalanced Forces. Covers the basics. By FuseSchool. Has a quick quiz - see below.
Video Quiz. Goes with the video above. Only 6 Qs. Self marking. Click the submit button and then click check score.
STILEAPP Login page New topic - FORCES. We will do several lessons from here but I will make them available one at a time. Start with lesson 1.1 What are Forces?
![]() Intro to free body diagrams. This is a nice simple intro, but consider that it has two main weaknesses. The normal force is not clearly explained, and the forces are not drawn to the correct length. However it does intro the idea well for year 7. 4 mins. Nerdstudy Physics
Intro to free body diagrams. This is a nice simple intro, but consider that it has two main weaknesses. The normal force is not clearly explained, and the forces are not drawn to the correct length. However it does intro the idea well for year 7. 4 mins. Nerdstudy Physics
![]() Good notes and explanation of free body diagrams. More technical - this is for the nerds in all of us. 7 mins. Flipping Physics.
Good notes and explanation of free body diagrams. More technical - this is for the nerds in all of us. 7 mins. Flipping Physics.
![]() Free Body Diagrams - Advanced. There is a booklet that goes with this video (see below). Produced by MIT. You need to know some basic free body diagram stuff first, but this is really useful for checking understanding. In case it dissappears a copy of the video is here.
Free Body Diagrams - Advanced. There is a booklet that goes with this video (see below). Produced by MIT. You need to know some basic free body diagram stuff first, but this is really useful for checking understanding. In case it dissappears a copy of the video is here.
![]() User guide and worksheets to video above. The first three pages are for teachers. The next 9 pages are the scenarios presented in the video - good to have a hard copy in front of you so you can write on it.
User guide and worksheets to video above. The first three pages are for teachers. The next 9 pages are the scenarios presented in the video - good to have a hard copy in front of you so you can write on it.
Constructing Free body diagrams - Interactive. By the Physics classroom. Do "situations" 3,10, 8, 1, 2 in that order (1 and 2 are the hardest... odd). Then do any two more. For each "situation", first write the description in your notebook and, when you have got the free body diagram correct, draw that beside your description. A list of the situations is here, but they are not in the same order they appear on the site.
Unit 4: Resource Management and Astronomy
![]() Learning Goals and Success Criteria
Learning Goals and Success Criteria
Assessment will be an exam near the end of term (approx week 7), followed by an assignment.
LG 1 - I understand that some of the Earth’s resources are renewable, including water that cycles through the environment, and that others are non-renewable.
Resources - SC 1,2.
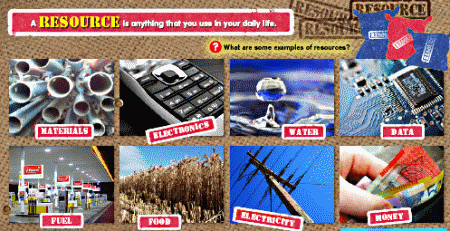
We will use the picture on p 62/63 in Oxford science 7 (i have a class set) to introduce the idea of a resource, and the idea of continuous, renewable, and non-renewable. Importantly here is to start with a very broad definition of resource (eg including soil, water, etc), rather than the common narrow definition of resources as energy related.
Summary of Energy resources. Notes including explanation, pros, cons and some Qs. Will use in class.
Water - SC 3-7.
Water cycle diagram. Single slide with a copy of the water cycle pic on the right.
Worksheet on the Water cycle. Info and very easy Q. We will need to complete definitions of the four key terms from the SC - use the diagram as a guide to students constructing these.
Worksheet - Limited water supply. Simple worksheet which provides info and Qs on the availability of fresh drinking water
![]() Diagram about Human impact on Water cycle.
Diagram about Human impact on Water cycle.
Run the river worksheets. These go with the "run the river" game below.
links to a downloadable water conservation game (murray river basin)
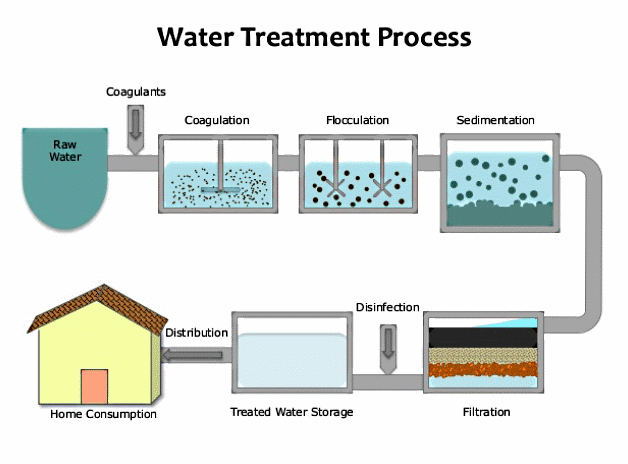
![]() Water treatment Steps. Simple doc with the main steps of water treatment. We should cut them out and paste into our book with labels for each step. Look up some of the new terms for homework. Answers to the Qs are below.
Water treatment Steps. Simple doc with the main steps of water treatment. We should cut them out and paste into our book with labels for each step. Look up some of the new terms for homework. Answers to the Qs are below.
![]() Answers to Qs on Water treatment (above).
Answers to Qs on Water treatment (above).
![]() Drinking Nasty Swamp Water Not a formal education video by a water authority. More of a save the world (I am being simplistic here) approach to the ideas of water filtration. Does cover the basic processes.
Drinking Nasty Swamp Water Not a formal education video by a water authority. More of a save the world (I am being simplistic here) approach to the ideas of water filtration. Does cover the basic processes.
LG 2 - I understand that predictable phenomena on Earth, including seasons and eclipses, are caused by the relative positions of the sun, Earth and the moon.
![]() Early astronomers timeline. Cut and Paste. Note Keppler and Galileo go in the opposite order of their birthdates... Galileo's major books released after Kepler died.
Early astronomers timeline. Cut and Paste. Note Keppler and Galileo go in the opposite order of their birthdates... Galileo's major books released after Kepler died.
![]() Simple schematics of moon, earth, planets and their orbits. Excellent for perspective. Add detail about rotational (27.3d, 24h, 27y respectively) and orbit (mooon is 27.3d or lunar is 29.5, earth is 365d).
Simple schematics of moon, earth, planets and their orbits. Excellent for perspective. Add detail about rotational (27.3d, 24h, 27y respectively) and orbit (mooon is 27.3d or lunar is 29.5, earth is 365d).
Why the moon is "upside down" in Australia. Good explanation of why phases look different in two different hemispheres.
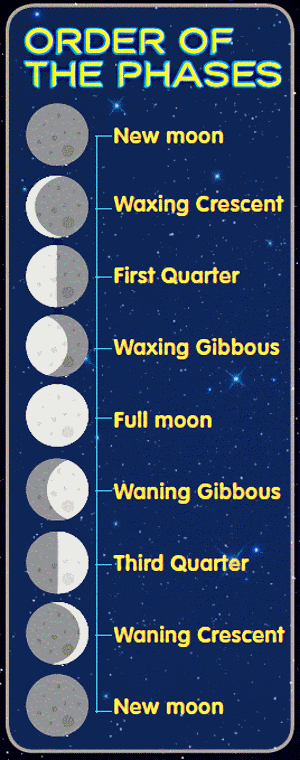
![]() Phases of the Moon - timelapse from southern hemisphere perspective. I can't figure out all the detail... truly nerding out here, somehow hypnotic!
Phases of the Moon - timelapse from southern hemisphere perspective. I can't figure out all the detail... truly nerding out here, somehow hypnotic!
Seasons
Season Interactive. The best part of this interactive is near the end, but you cannot skip the start. The last few sections are a very useful model in some teacher directed teaching. Preview first.
Seasons in Australia - Explaination. ABC Science site. Nice coverage and reasonably simple. Has a graphic I copy and print out for notebooks. Can get all the notes you need from here.
STILEAPP Login page New topic - Our place in Space. There are two lesson available for you to do: lesson 3.1 Seasons, and lesson 3.3 Daylight hours.
We will do an experiment using a narrow beam of light illuminating some graph paper with 5mm squares. By tracing the outline of the light and counting the squares we can measure the surface area the light would cover on Earth. varying the angle of the beam by 10 degrees (80, 70 ,60, 50 ,40 ,30) Should allow a graph of "angle of the sun" and "relative coverage of the earth" to be made. Thi should then enable conclusions about the temperature at different parts of the Earth.
Phases
Moon Phases Interactive. By Education Services Aust and offered on the scootle platform. I use this in class to show phases correctly for the southern hemisphere. Comprehensive and excellent for teacher use in the classroom. Start at first screen but the fourth onwards (click the next button) explains phases.
![]()
![]()


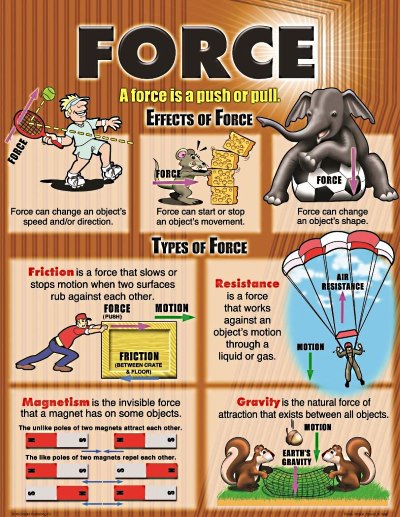 Types of forces poster.jpg Better resolution
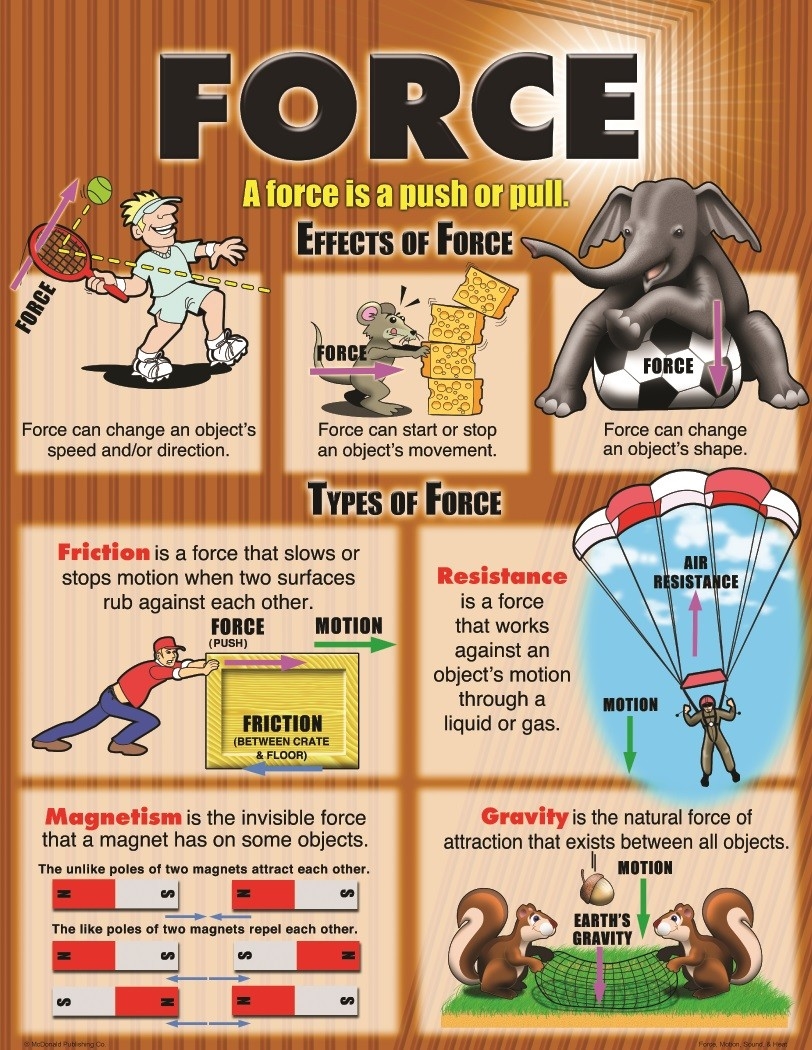
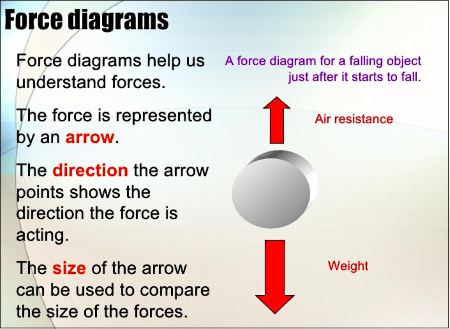 Forces Diagram.jpg Better resolution
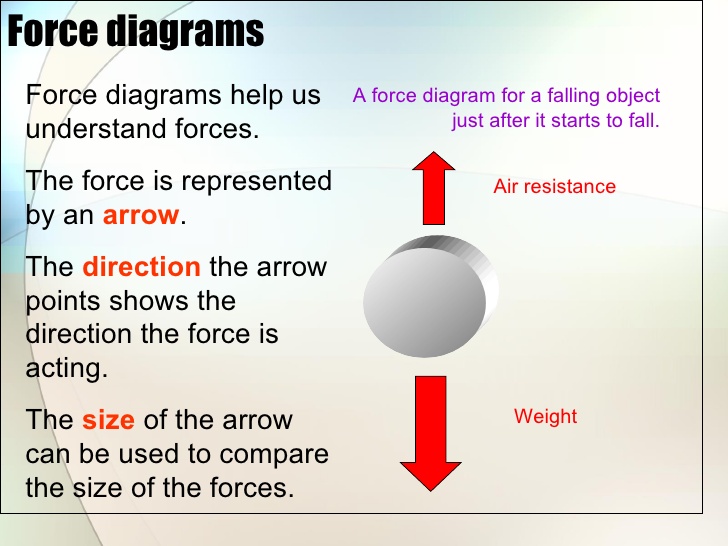

 Gary Turner Science
QLD Alan Druery Excellence in Teaching Award (QCT)
QLD Secondary Teacher of the year Award (AISTL)
QLD Centenary of Federation Teaching Award (RACI)
Peter Doherty Excellence in Science Teaching Award
Prime Minister Commendation for Science Education Award